• Skip to primary navigation
  • Skip to main content
  • Skip to primary sidebar

Food Mamma

Food | Travel | Family | Life

  • home
  • about me
  • recipe index
  • eating out
  • events
  • travel

Search Results for: dessert

guest blogger: bernice’s blueberry lattice pie with lemon zest and spruce buds

June 17, 2014 By Fareen 1 Comment

Life has been busy and my blog has been a little neglected lately. I’m so happy to have Bernice from Dish ‘N’ The Kitchen guest blog today. Her blueberry pie sounds scrumptious! Thanks Bernice!

~ 

Sometimes life has a way of grabbing on and taking time away from blogging. Sometimes it’s difficult to keep up with blog post when situations arise…but not all these life situations are bad! My friend and fellow blogger, Fareen at Food Mamma has just become a new mother and she may be just a bit distracted over the coming months. She needs a bit of extra time to settle in with her new family dynamic and to get to know her new little one. I’m excited and honoured to be a guest post on her blog…my first guest post!  Fareen and fellow readers; grab a cuppa and please enjoy this pie post from my kitchen to yours.

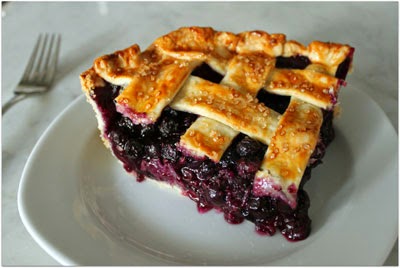
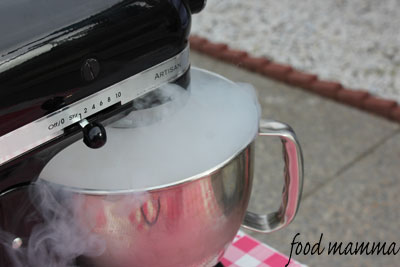
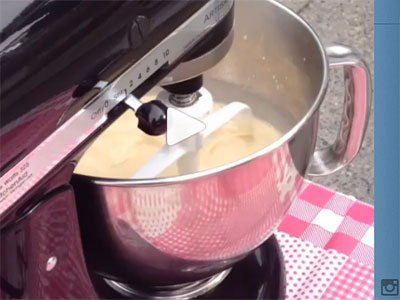
Blueberry Pie. Mmmmm. I just couldn’t get it out of my head following Monday’s Masterchef US episode.  Monday’s blueberry pie episode was inspirational; so many lovely pie variations and so many different methods of making pastry as well.  I’ve actually been making a lot more pies than I used to…using different methods and ingredients so that I can find ‘the pastry recipe’ that works for me. I’ve had great success using my KitchenAid mixer but now that I have a food processor it’s almost scary how fast I can whip up a batch of pastry. Sometimes it’s just too convenient!

The pastry method I used for this pie was described by Inspired Taste. Essentially you just add a portion of the flour, salt, and sugar then add all the butter one bit at a time pulsing in between. then you add the remainder of the butter. The butter ends up coating the flour and protecting it from the cold water you add later. In the end less gluten is formed, making the pie crust tender and flaky. I also usually have such a difficult time rolling out pastry dough…but not with this recipe! I was pretty impressed with this pastry method and so was the family. I think it may be a ‘keeper’.

Phew! Now that I have that evil pie essential that is pastry out of the way we can talk filling. Obviously blueberry. What I saw on the show was a plethora of mixes but I wanted to do something completely different. I wanted my filling to be unique and I was inspired by my childhood and a friendly reminder of it during a dessert I had at Q Haute. It was called Blueberry & Pine. These two flavours really work together though really that is no surprise considering how close they are in nature. As a kid I spent many days picking wild blueberries with my grandma in remote bush areas. She would get word on where the picking was good and off we would go, ice cream pails attached to our belts. We wouldn’t go home until they were full. As we picked we breathed in the scent of pine while we stole the odd mouthful of berries. I wanted my pie to contain that memory.


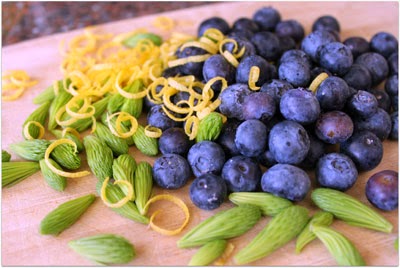
I’ve been waiting patiently for the spruce tree in my front yard to bud. I think it happened a bit later this year but last week I was able to pick a container full of the buds. I had enough to pickle a couple of jars for later use with a just enough left over to add to the pie filling. I also added some lemon zest because I think it is an essential ingredient in blueberry pie. Other than that, a large pinch of freshly ground allspice, some sugar, cornstarch, and salt. Pretty simple.

Pie Pastry (from Inspired Taste)

2 1/2 cups (360 grams) all-purpose flour
1 teaspoon kosher salt
1 tablespoon sugar, optional
1 cup (227 grams) very cold unsalted butter, cut into 1/2-inch cubes (2 sticks)
6 to 8 tablespoons ice water

Add 1 1/2 cups flour, salt and sugar to a food processor. Pulse 2 to 3 times until combined.
Scatter butter cubes over flour and process until a dough or paste begins to form, about 15 seconds. It will look nice and ‘sandy’.
Scrape bowl, redistribute the flour-butter mixture then add remaining 1 cup of flour. Pulse 4 to 5 times until flour is evenly distributed. (Dough should look broken up and a little crumbly).
Transfer to a medium bowl then sprinkle 6 tablespoons of ice water over mixture. Using a rubber spatula, press the dough into itself. The crumbs should begin to form larger clusters. If you pinch some of the dough and it holds together, it’s ready. If the dough falls apart, add 1 to 2 tablespoons of extra water and continue to press until dough comes together.
Remove dough from bowl and place in a mound on a clean surface. Work the dough just enough to form a ball (do not overwork). Cut ball in half then form each half into discs. Wrap each disc with plastic wrap and refrigerate at least 1 hour, and up to 2 days. You can also freeze it for up to 3 months (just thaw it overnight in the fridge before using).
Before rolling, take pastry out and let sit for five minutes. Flour your work surface and roll one disk of dough out to 1/8 inch thickness using your pie plate as a size guide.
Fill pie shell with blueberry filling.
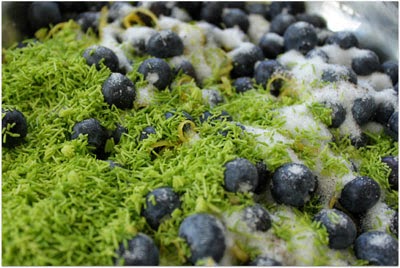
Blueberry Filling

3/4 cup sugar
1/4 cup cornstarch
good pinch freshly ground allspice
1 tbsp lemon zest
pinch salt
1/2 cup finely cut fresh spruce buds
1 tbsp cold butter cut in tiny cubes
1 egg yolk
1 tsp cream
coarse sugar

Mix all together in a bowl. Place in pie crust.
Pre heat oven to 400 F.
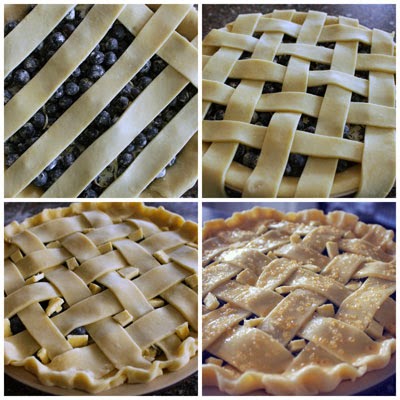
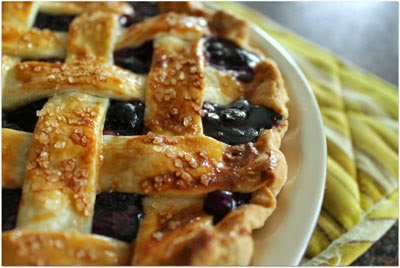
Take the second disk of pastry, roll it out and cut into strips as wide as you like. I ended up with five strips covering the diameter of the pie, then another five in the other direction.
Weave the strips over the filling as you place them and make sure the ends over hang the edges of the bottom pastry.
Tuck the ends under and pinch the crust edge all the way around the pie.
Dot exposed filling in between strips with tiny cubes of butter. Refrigerate pie for another 30 minutes.
Mix egg yolk and cream in a bowl and brush pastry before baking. Sprinkle pastry with coarse sugar.

Place pie on a cookie sheet in bottom 1/3 of oven and bake for 20 minutes. Reduce temperature to 350 F and bake for another 35-45 minutes. The crust should be nice and golden and the filling will be bubbly.

WARNING! this is the hard part….let cool for 3 hours so that the filling sets.

Filed Under: foodmamma Tagged With: baked goods, fruit, guest blogger, pie

banana nutella spring rolls

March 13, 2014 By Fareen Leave a Comment

While we were in Houston in December, we stopped to have dinner at one of my favourite restaurants, P. F. Changs. We may have gone there a couple times, but more on that later.

We had ordered the banana spring rolls for the three of us to share.  Hubby and I were lucky to get a bite before Q inhaled the dessert. He loved it! How could you not? Bananas enveloped in the crisp spring roll wrapper and topped with ice cream and caramel. Yum!

This was a super easy dessert to make at home. In fact, it was made even better with Nutella!  A spread of chocolate down the middle of a spring roll wrapper, a spear of banana, rolled and fried to perfection. It’s fruit so it’s not bad for you, right?

Filed Under: foodmamma Tagged With: dessert, fruit

cruising on the disney wonder – palo restaurant

We had a fabulous brunch at Palo. Recommended by veteran cruisers, it was a definite must-do and we discovered for ourselves why. Located on the 10th deck, the restaurant has a great view of the ocean while you dine. Your brunch, now $25 per person (an increase of $5 from when we booked) includes a glass of sparkling wine or a mimosa.

There are a few tables full of delicious food as well as a selection of entrees that you can order. My favourite table was the seafood one. Crab, jumbo shrimp cocktail, salmon mousse, cajun ahi tuna, scallops and caviar. It was amazing and I would have been happy with just this one table.

There was a huge table filled with cheese and crackers and another with Mediterranean dishes like hummus and sundried tomatoes and a really lovely tuna nicoise salad made with ahi tuna.

There were two tables filled with sweet treats. One with pastries like croissants and cinnamon buns, the other with items like panna cotta and cakes. It took a lot of restraint to not try it all but the couple that I did try definitely satisfied my sweet tooth.

We had a fantastic server from Croatia, Tony. He was helpful and attentive and provided amazing curstomer service, like we experience through out the ship.

If you have a little bit of time, I would definitely recommend Palo for brunch.

cruising on the disney wonder – castaway cay

http://www.foodmamma.com/2014/01/cruising-on-disney-wonder.html

We lucked out on our day at Castaway Cay, Disney’s private island in the Bahamas. It was a sunny day, 28 degrees celsius and the water was a lovely blue, so clear that you could see the fish swim right by our legs.

There are 4000 chairs, so no need to rush off the boat to claim one. Right when you get off the ship, there is a post office, where you can buy stamps and mail some postcards. There are two post cards in each room but you can always ask for more from your state room attendant.

Just past that, we were greeted by Donald, and down a little ways, Minnie. It was a great chance to get some pictures with the characters without standing in long lines. We got off the boat an hour after we docked, so perhaps we beat the rush.

There is a tram that takes you to various points on the island. We got off at the first stop which was close by one of the souvenir shops as well as to Cookies, where lunch was going to be served. If you continue on the tram, it ends up at Serenity Bay, the adults only part of the island.

Lunch was a big barbecue with burgers, hot dogs, ribs, cajun mahi mahi and rotisserie chicken. It included all the fix-ins like coleslaw, potato salad and corn on the cob.  For dessert, there was cobbler and great big chocolate chips cookies. There were also stations set up with whole and sliced fruit, ice cream and drinks.

Hubby went snorkelling and saw a submarine with an abandoned ship under the water. It was a fantastic stop and made for a really fun beach day.

smoked salmon crepes

January 17, 2014 By Fareen Leave a Comment

I love a good crepe. Whether it be savoury for lunch or dinner or sweet for a perfect dessert, they are so versatile. 

When deciding what to have for dinner the other night, I noticed some smoked salmon in the freezer. With spinach and cheese in the fridge, crepes just seemed like the way to go.

I decided to go with a recipe from Alton Brown. As intimidating as he seems, he really knows his stuff!  This recipe comes together really quickly in a blender.  Brown suggests placing the batter in the fridge for an hour, allowing the bubbles to subside thereby making it less likely for the crepes to tear.

Usually with crepes, they say one for the pan. That was true in this case, but the following crepes turned out great! They cooked quite quickly and dinner was on the table in less than half an hour. Smeared with Boursin and topped with the salmon, spinach and green onions, these were delish!

This recipe made quite a few crepes, meaning we had some for dessert as well! Dulce de leche was poured down the middle, and rolled into the perfect sweet ending.

Crepes
From Alton Brown, Good Eats

2 large eggs

3/4 cup milk

1/2 cup water

1 cup flour

3 tablespoons melted butter

Butter, for coating the pan
In a blender, combine all of the ingredients and pulse for 10
seconds. Place the crepe batter in the refrigerator for 1 hour, allowing the bubbles to subside.

Heat a small non-stick pan. Add butter to coat. Pour 1 ounce of
batter into the center of the pan and swirl to spread evenly. Cook for
30 seconds and flip. Cook for another 10 seconds and remove to the
cutting board. Lay them out flat so they can cool. Continue until all
batter is gone.

Filed Under: foodmamma Tagged With: dessert, seafood

president’s choice for the holidays!

December 22, 2013 By Fareen Leave a Comment

Christmas and baking seem to go hand in hand and that’s certainly true in this household. Baked goods as gifts for friends and family just seems so personal and special. With just a couple days left until Christmas, President’s Choice has you covered with a giant array of mixes for those with time constraints or those who think they can’t bake.

I was excited when they sent over a box of holiday goodies for me to try out. It included everything from mixing bowls, measuring cups, baking mixes, cookies as well as great hostess gifts like chocolate!

Q and I spent the morning making gingerbread men! All that we needed to add to the mix was an egg and some water. This was perfect, since I didn’t really feel like running out for some molasses and other stuff I would have needed. Q was in charge and he felt a great sense of accomplishment, being able to say that he made the cookies himself.

I loved that President’s Choice also had a gingerbread man cookie cutter complete with stencils to help with the decorating.  He gave these out to his cousins and they made cute little gifts.

President’s Choice also has some great items that would be perfect for your dinner party, either for Christmas or New Year’s. Items like the PC Moroccan Cigars or the Shrimp & Scallop Sushi Bites would be perfect appies. For dessert, our Christmas dinner will definitely include the PC Decadent Molten Chocolate Cakes. I might also have to include a sugar cookie tree (cutters from PC!).

Disclosure: I received a variety of products from President’s Choice along with a gift certificate to try out some of their frozen items. I was under no obligation to write about them. Opinions are my own.

Filed Under: foodmamma Tagged With: sponsored

food blogger cookie swap: lavender shortbread

December 11, 2013 By Fareen 2 Comments

I had a really fun experience last year when I participate
in the 3rd Annual Food Blogger Cookie Swap. I got to connect with bloggers that I didn’t know and of course, taste some delicious cookies!

This year, with us leaving on holidays, I had to think twice
whether I could make the deadlines. I decided I just couldn’t miss out. For the
swap, we needed to make a new recipe we hadn’t tried before and send it to
three assigned food bloggers.

I knew I wanted to try something with lavender. Most of the
cookies I had found with lavender were of shortbread. Mmmm….shortbread!

I chose this recipe from Dessert First because it was simple
– butter, sugar, flour. My kind of shortbread. You don’t need a lot of
lavender, a little goes a long way.

In the midst of work deadlines, Q’s activities and packing,
I managed to find a chunk of time to bake, wrap and send the cookies. In my
haste though, I completely forgot to include the personalized letters along
with the recipe – sorry folks!

Thanks to the bloggers that sent me cookies. I did receive
one package before I left and they were a nice sweet treat. Looking forward to
devouring more when I get back home!

Thanks to Lindsay and Julie for organizing another
successful cookie swap! Through blogger participation, over $13K was raised for
Cookies for Kids’ Cancer.

Lavender Shortbread
Adapted slightly from Dessert First

1 cup butter, softened
2 cups flour
1/2 cup icing sugar
1 tablespoon dried lavender

Beat the butter and sugar in a mixer until creamy.
Add the flour and beat until combined. Add the lavender and beat just to
distribute through the dough.

Form the dough into a log, wrap in plastic and chill for about an hour.

Preheat the oven to 325 degrees.  Cut the logs into rounds and place on parchment lined baking sheets
and bake until just golden, about 18 minutes.

Filed Under: foodmamma

cousin’s night out: pio peruvian

November 29, 2013 By Fareen 1 Comment

I am loving our monthly cousin’s nights out! We’ve had a few now and it’s been fun trying new restaurants and taking the time to hang out.  We all get a chance to choose a restaurant, order dependent on birthdate.

This month, it was hubby’s turn to choose a restaurant. After much deliberation, he chose Pio Peruvian. We had been wanting to check out the place for a while so it was perfect that we could do it with our cousins. The restaurant, located on Sunridge Way, was small but packed – always a good sign for any restaurant.

Since we were having dinner on a Thursday, we were able to have the El Menu Special – an appetizer, entree and dessert for $18.99.  We started with ceviche. The marinated tilapia was served with sweet potato and toasted Peruvian corn. This was refreshing and spicy and a great way to start the meal.

Hubby and I also shared the Salchipapa – beef sausage with fries and Pio sauce. The sausage was sparse but good and the fries were amazing.

For our main, we had the Pollo Saltado. Flavourful pan-fried chicken with onions, tomatoes and peppers served with fries and rice. Our chicken dish was amazing. It’s one I think about often and I can’t wait to go back for more.

We ended our meal with Alfajores – shortbread cookies filled with dulce de leche. I thought it would just be a regular shortbread cookie but it was far from it. The warm cookie was buttery and flaky and the caramel made an amazing addition. It was a delicious way to end a tasty meal.

Do you have any suggestions for our next dinner?

Pio Peruvian Rotisserie Chicken on Urbanspoon

Filed Under: foodmamma Tagged With: cousins, eating out

state and main

August 7, 2013 By Fareen Leave a Comment

When a restaurant is able to provide me with many choices for appetizers that I can fill myself with a meal of them, I am a happy girl.  That is exactly what happened last week when I checked out the new State and Main with some media friends. State and Main is the new kid on the block, opening its doors in Calgary at Chinook Centre. From the same people that brought us Original Joe’s, State and Main offers classic comfort food with character.

All the appetizers we enjoyed were delicious! These included the Chicken Gyoza, Spicy Tuna Tartare, Dragon Boat Lettuce Wraps, Mama’s Meatballs, Calamari and Butter Chicken Poutine. My favourite were the Bang Bang Shrimp. I could probably have eaten these all by myself.

The mains were also tasty and the ones we tried included the Long Beach Fish Tacos, Red Thai Shrimp Curry and the Buffalo Chicken Cheese Steak. The fish tacos were a fave amongst our whole group.


Definintely looking forward to going back to try out the dessert menu and for some more Bang Bang Shrimp!

State & Main on Urbanspoon

Filed Under: foodmamma Tagged With: eating out, events

salted caramel ice cream & liquid nitrogen

July 9, 2013 By Fareen 2 Comments

When we went to Teatro earlier this year for their tasting menu, we had one of the best desserts I have ever tasted – caramel ice cream made with liquid nitrogen. The ice cream was so creamy because it didn’t have time to form ice crystals the way it does with a traditional method.  It was amazing!

R and P were with us that night and they asked if we could attempt the ice cream for one of their wedding events last week. Getting to make and eat ice cream and getting to play with liquid nitrogen, how could we say no!

I searched for a recipe and found a great one from Charmian from The Messy Baker.  I made a couple changes, omitting the milk and using only cream.

Making the ice cream on the spot with the liquid nitrogen provided some entertainment while people waited for dessert.  Everyone seemed intrigued with the cloud of smoke coming from the standmixer as the cream and sugar liquid turned into a frozen delight.  The resulting ice cream was delicious and creamy. Definitely a fun and entertaining way to make ice cream.

(Click to see the video)


Congratulations R and P!! Wishing you both a lifetime of happiness!

Salted Caramel Ice Cream

1 1/4 cup granulated sugar, divided
3 1/2 cup whipping cream, divided
1/2 tsp fleur de sel, or any sea salt

In a large pot, heat 1 cup of sugar over medium heat. Stir gently until the sugar starts to melt. When it does, stop stirring but continue to cook the sugar, swirling the skillet occasionally to ensure the sugar melts evenly. The caramel is done when it turns dark amber.

Immediately remove the pan from heat and carefully stir in 1 1/4 cups cream. Continue cooking until all the caramel has dissolved. Pour the caramel into a bowl. Add sea salt and vanilla. Allow the caramel to cool to room temperature. This caramel is delicious, try to save some for the ice cream.

Meanwhile, bring the remaining cream, and remaining 1/4 cup sugar just to a boil. Allow to simmer 15 minutes then set aside to cool.

When both the cream mixture and caramel have cooled to room temperature, remove the skin from the cream mixture and stir it into the caramel. Refrigerate until ready for ice cream.

With your mixer running, add the liquid nitrogen in batches until you get it to ice cream consistency. Be extremely careful when using the liquid nitrogen.

Filed Under: foodmamma Tagged With: ice cream

  • « Go to Previous Page
  • Page 1
  • Interim pages omitted …
  • Page 6
  • Page 7
  • Page 8
  • Page 9
  • Page 10
  • Interim pages omitted …
  • Page 12
  • Go to Next Page »

Primary Sidebar

Let’s Connect!

  • Email
  • Facebook
  • Instagram
  • Pinterest
  • Twitter

Hello!

My name is Fareen and I'm so happy you stopped by! This blog is about my favourite things - family, food and travel. Here you will find adventures with hubby, my two boys and my great big family. There is food (lots of food!), as much travel as we can squeeze in and just life in general.

Sign up for our mailing list!

* indicates required

Featured Post

Afternoon Tea

Afternoon Tea

Copyright © 2009–2020 · Food Mamma / Fareen Jadavji-Jessa· All Rights Reserved / Privacy Policy