• Skip to primary navigation
  • Skip to main content
  • Skip to primary sidebar

Food Mamma

Food | Travel | Family | Life

  • home
  • about me
  • recipe index
  • eating out
  • events
  • travel

celebrations

baked apple chips for apple month

February 20, 2013 By Fareen Leave a Comment

February is Apple Month! Apples are a staple in our house. Q likes the little ones that he can grab and crunch on and they are perfect to throw into hubby’s lunch.

To celebrate, BC Tree Fruits is having a contest where you and your charity can win $2,000.  The Good To Go campaign asks fans to share a photo showcasing where and how they enjoy their apples. Click here for more info.

We changed it up a bit for Q’s snack and made a batch of apple chips. Perfect for nibbling on while watching Dinosaur Train.
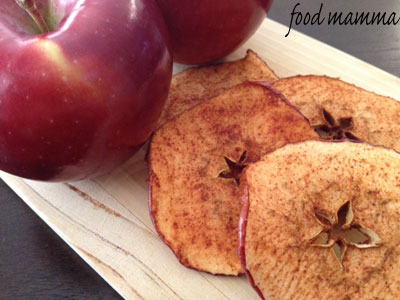
Baked Apple Chips

2 apples
2 TB agave syrup
1 tsp cinnamon

Preheat oven to 200 degrees F. Slice the apples as thin as possible and place on a baking sheet.

Combine the agave syrup and the cinnamon together.  With a pastry brush, paint the apple slices with the paste.

Bake for an hour and a half until the apples are crisp.

Filed Under: foodmamma Tagged With: celebrations, fruit

homemade almond joy

February 18, 2013 By Fareen Leave a Comment

It’s become a tradition that hubby gets homemade chocolates for Valentine’s Day.  I was looking for something different this time, having already made truffles a number of times, and homemade Ferrero’s last year.

I considered homemade turtles but then realized the caramel and pecans would be more for me than my love. When I found this recipe for homemade almond joy from Joy the Baker, I thought it was the perfect idea.

It didn’t take long and the chocolates tasted so close to the real thing.  Of course, my little man had to get a box too!  I made his a little smaller and he was so excited to get some homemade chocolates from his mamma.


Homemade Almond Joy
From Joy the Baker

7 ounces sweetened condensed milk
1 cup powdered sugar
1 tablespoon pure vanilla extract
pinch of salt
2 1/2 cups unsweetened flaked coconut
30 roasted almonds
about 20 ounces of good quality semi sweet chocolate chips

In a medium bowl, whisk together sweetened condensed milk, powdered sugar, salt and vanilla extract.  Stir in the unsweetened coconut.  The mixture will be thick.  Place mixture in the freezer for 30 minutes. 

Line a baking sheet with parchment paper.  Remove the coconut mixture from the freezer.  With clean hands shape one tablespoon of coconut into a little log about 2 inches long and 3/4-inch thick.  Press the logs together very well so they don’t crack when dipped.    Place the log on the lined baking sheet and continue until all of the coconut mixture is gone.  Place the baking sheet in the fridge to chill while you melt the chocolate.

Place a medium  pot with two inches of water over a medium flame.  Bring the water to a simmer.  Place chocolate chips in a heat proof bowl and place the bowl over the simmering water.  Stir the chocolate as it melts.  Turn off the flame once the chocolate has melted but keep the bowl of melted chocolate over the hot water.

Remove the formed coconut from the fridge.  Place one coconut almond log on a fork.  Use a spoon to scoop a bit of chocolate over the almond.  This will help the almond stick to the candy and not fall off during dipping.  Lower fork into chocolate and spoon chocolate over candy to coat.  Lift fork and gently shake to release some of the chocolate.  Scrape the bottom of the fork along the side of the bowl and place on the lined baking sheet. 

Let dipped candy harden in the fridge for 45 minutes.  Store in an airtight container at room temperature.  If you need to layer the candy in a container, use waxed paper to separate the layers

Filed Under: foodmamma Tagged With: celebrations, chocolate

happy valentine’s day!

February 14, 2013 By Fareen Leave a Comment

Happy Valentine’s Day!  Hope you all have a fabulous day celebrating with sweets and chocolate.

This year, Q wanted to make some cookies for his friends.  I thought it would be a great time for us to try a new roll out shortbread recipe.  I found one that had gotten some great reviews but for some reason it didn’t work for us!  I ended up with a really dry and crumbly dough that just wouldn’t come together.  I played around, added butter, then more butter…. Finally a splash of cream turned it into a pliable dough.  Despite the additions to the recipe, the cookies tasted great – butter and cream makes everything good!

Q had fun rolling out the dough and cutting out the hearts.  It was a great Valentine’s activity.

I wanted to decorate the hearts but needed something fast and without sprinkles.  This glaze worked perfectly.  One dip of the heart in the glaze and they were fully decorated.  Half the recipe coated 35 hearts.

Sugar Glaze for Cookies

2 cups icing sugar
1/3 cup milk
food coloring

Mix the ingredients together and it’s ready to use.

Filed Under: foodmamma Tagged With: celebrations, cookies, icing

happy chinese new year!

February 10, 2013 By Fareen Leave a Comment

Filed Under: foodmamma Tagged With: celebrations

happy new year!

January 2, 2013 By Fareen Leave a Comment

Wishing you and your families a fantastic 2013 filled with lots of love, loads of cuddles, tons of happiness and a belly full of good food!

Filed Under: foodmamma Tagged With: celebrations

coconut cake with a red velvet surprise for mom’s birthday

November 26, 2012 By Fareen Leave a Comment

Today is my mom’s birthday!  We celebrated with family time, good food and of course, cake.

For her special day, I decided to do a twist on one of our favourite cakes – coconut.  I had made some red velvet cake pops the day before for a birthday and decided to incorporate the two.  Since the cake balls that I make are made of just cake (no icing), I placed the cake balls in between the coconut batter before baking.

I was a little worried about the red velvet balls over baking but the resulting cake turned out perfect.  The coconut cake was moist and the red velvet was a nice surprise.  Topped with a coconut cream cheese frosting and shreds of toasted coconut, it was the perfect way to celebrate my fabulous mom.

Filed Under: foodmamma Tagged With: cake, celebrations

doodle cupcakes for q’s 4th birthday

November 6, 2012 By Fareen Leave a Comment

I can’t believe my little man is four today! The time is just flying by, it seems like he was just born. He is the most precious gift and my life would not be the same without him in it.

As with all birthdays in our house, we celebrate all week long and his celebrations started on Friday at preschool. There were cake pops and Spiderman and he came home so happy that he got to celebrate with his school friends.

For his actual birthday, I wanted to ensure that it was extra special and the cake always has a part in that. For the cake, I loved the idea that I saw on Sweetapolita with the doodle cake. I knew Q would have a blast decorating his own cake.  I decided to make cupcakes with individual toppers which we all decorated together. It was a lot of fun and it gave us a project to do on Monday evening.

The toppers were made with fondant which I cut into circles with a cookie cutter. I’m not sure why, but fondant really scares me. Well, it did anyways until I found this fabulous recipe via Pinterest.  A fondant made with only marshmallows and icing sugar via Clockwork Lemon. It didn’t take long to come together and, when it did, it was perfectly smooth for some of Q’s (and mamma’s) artwork.

I decided to forego on the icing and instead use a glaze. I’ve been using this recipe for years and it’s so simple to make.

The resulting cupcakes are perfect for celebrating a 4 year old!

Chocolate Glaze

3 TB water
2 TB butter
3 TB cocoa
1 cup icing sugar

Place the water and the butter in a sauce pan and bring it to a boil.  Take it off the heat and immediately mix in the cocoa. Gradually add in the icing sugar and keep mixing until you get the proper consistency.

Marshmallow Fondant
From Sweetapolita

1 cup mini marshmallows
3 TB water
1 to 2 cups icing sugar

Place the marshmallows in a microwave safe bowl and coat them with water.  Warm them up in the microwave in ten second intervals until the marshmallows puff up and can be stirred.  Slowly add icing sugar into the mixture.  When it starts coming together, grease your hands with butter and knead the mixture until it stops being sticky and can be rolled out.

Filed Under: foodmamma Tagged With: cake, celebrations, cupcakes

ice cream cake…and hubby’s birthday!

November 1, 2012 By Fareen 2 Comments

We celebrated hubby’s birthday on Monday.  It wasn’t a big celebration, just a small family dinner with his mom’s cooking and loved ones.  Hubby loves ice cream cake from DQ so this year, I thought I would tackle it myself.  The best part of the store bought cake is the middle layer with the fudge and the chocolate crunchies.  Thanks to Pinterest, I found how to make them with only two ingredients! Although the original cake is all ice cream, I added a layer of chocolate cake, to make it even better.

The verdict?  Hubby loved it!  In fact, he made sure we took the leftovers home, always a good sign.  The crunchy middle tasted just like the DQ version. The chocolate cake with the fudge, the crunchies, ice cream and whipping cream all together made the perfect bite.

Cookies and Cream Ice Cream Cake
(Adapted from Our Best Bites and Brown Eyed Baker)

1 layer chocolate cake (I used this recipe)
3 TB fudge sauce
2 cups Cookies and Cream ice cream, softened


Chocolate crunchies:
2/3 package oreo cookies
3/4 to 1 bottle Magic Shell

Whipping Cream:
1 cup whipping cream
1 TB icing sugar
 
Line a springform pan with saran wrap.  Place a layer of your favourite chocolate cake at the bottom.  Spread a layer of fudge sauce on the cake.

Place the oreo cookies in a food processor and pulse until crushed – small bits not powder. To the crushed cookies, add 3/4 to 1 whole bottle of Magic Shell.  Spread this over the fudge layer of the cake. Place in the freezer for a couple of minutes.  Take the softened ice cream and create a layer on top of the crunchies.  Let freeze overnight.

The next day, whip together the cream and the sugar.  Ice the cake with the whipping cream. Top with mini Oreos or shaved chocolate. Place back in the freezer until ready to eat.

Filed Under: foodmamma Tagged With: cake, celebrations

burfi for my sister’s wedding

June 15, 2012 By Fareen 4 Comments

It was so busy and crazy last week as we spent some time in Vancouver for my sister’s wedding.  It was kind of a reunion of sorts, people flying in from Calgary, Toronto, Austin, Dubai…. We also spent time with our Vancouver family and I got to meet nieces and nephews I hadn’t met before.  It was nice getting to know our lovely new family as well, my sister’s husband’s.  I still can’t believe she’s married!

You cannot have an indian wedding without sweets, and boy, did we have a lot!  Everyone contributed in making something.  From carrot cake to nan khatai, we had something to please every palate.

My contribution was burfi.  Burfi is a sweet confection made from milk and sugar, reminiscent of fudge.  Hubby’s aunt made a really tasty batch last year for my sister-in-laws wedding and she was happy to show me how to make it.  Thank you N!

To my sister and her husband, my wish for you is loads of love and
happiness!  I’m so happy you found each other.  Love you lots!

Burfi

500 grams milk powder
1 1/2 cups of sugar
1 cup water
1/2 pound of unsalted butter, cut into pieces
1/2 can of evaporated milk
red food colouring
nuts, optional

Combine the sugar with 1 cup of water and allow it to boil for about half an hour, until it gets to the soft ball stage.

Remove the pot from the stove and add the butter, mixing until it has melted.  Add the milk powder and mix well.  Add 1/2 can of evaporated milk. The mixture should be like a thick batter.

In a 9″ x 13″ parchment-line pan, pour in half the mixture and push it to the corners so that it covers the entire dish.  Add a few drops of food colouring to the other half until you have a nice pink hue.  Pour this pink mixture onto the white layer.  At this point, you can sprinkle some nuts.

Refrigerate for one day before you cut it into pieces.  Do not cover while refrigerated to ensure that the burfi dries well.  Makes 40 to 50 pieces depending on the size.

Filed Under: foodmamma Tagged With: celebrations, dessert, sweets

egg boats

May 26, 2012 By Fareen Leave a Comment

Hard to believe my sister is getting married in two weeks! With her and her fiance living in two different countries, it’ll be nice for them to finally be together.

Before my sister and her fiance headed out of town for one last adventure before their wedding, we had a little family breakfast as a send off.  We had lots of sweets – pain au chocolat, tres leches cake, chocolate chip cookies.  We also had fresh fruit, turkey bacon, chicken sausages, hashbrowns, samosas…and egg boats!

I was going to do my usual frittata.  Always a hit and super easy, it’s one of my go-to breakfasts.  I came across this egg boat though on Pinterest and knew I had to change it up.

This recipe comes from the site Spoon Fork Bacon.  I loved the idea of the eggs baked into the bread with all those veggies.  The result was a very tasty breakfast and something a little different.

Instead of using mini baguettes, we used two long ones to feed the crowd.  I kind of wish I did one more to enjoy for breakfast the next day. This recipe is definitely a keeper!

Egg Boats
Adapted from Spoon Fork Bacon

1 long baguette
6 eggs
1/3 cup heavy cream
1/2 cup grated cheddar
2 green onions, sliced
1 red pepper, diced
1/2 onion, diced
salt
pepper

Preheat oven to 350 degrees F.

Cut a deep “V” through the top of the baguette until about a 1/2 inch to the bottom. Partially unstuff the baguettes.

Place the eggs and cream into a mixing bowl and lightly beat together. Whisk in the remaining ingredients and lightly season with salt and pepper.

Pour the mixture into the baguette boat and place onto a baking sheet.

Bake for 35 to 40 minutes or until golden brown, puffed and set in the center.

Allow to cool for about 5 minutes, cut and serve.

Filed Under: foodmamma Tagged With: breakfast, celebrations

  • « Go to Previous Page
  • Page 1
  • Interim pages omitted …
  • Page 5
  • Page 6
  • Page 7
  • Page 8
  • Page 9
  • Go to Next Page »

Primary Sidebar

Let’s Connect!

  • Email
  • Facebook
  • Instagram
  • Pinterest
  • Twitter

Hello!

My name is Fareen and I'm so happy you stopped by! This blog is about my favourite things - family, food and travel. Here you will find adventures with hubby, my two boys and my great big family. There is food (lots of food!), as much travel as we can squeeze in and just life in general.

Sign up for our mailing list!

* indicates required

Featured Post

Poke Rice Waffle

Poke Rice Waffle

Copyright © 2009–2020 · Food Mamma / Fareen Jadavji-Jessa· All Rights Reserved / Privacy Policy