• Skip to primary navigation
  • Skip to main content
  • Skip to primary sidebar

Food Mamma

Food | Travel | Family | Life

  • home
  • about me
  • recipe index
  • eating out
  • events
  • travel

Search Results for: eggs

chocolate cheesecake

October 22, 2012 By Fareen Leave a Comment

We had a small family get together at my sister-in-law’s new place last weekend.  When we got the invite from her and her hubby, I offered to make dessert, and cheesecake automatically popped into my mind.  It had been a long time since I had eaten cheesecake, let alone made it.  Q decided we should make chocolate and I willingly obliged.

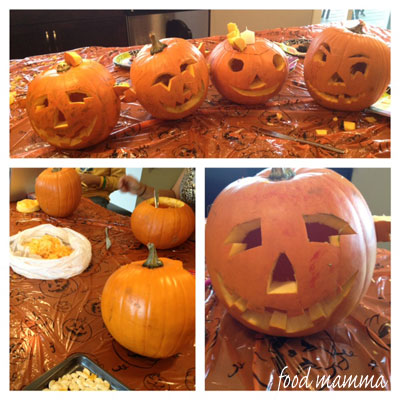
It was a great afternoon with spending time with family and eating good food. Both the kids and the adults kept themselves busy carving pumpkins. The seeds were scooped and roasted making them a perfect snack to go along with all the carving.

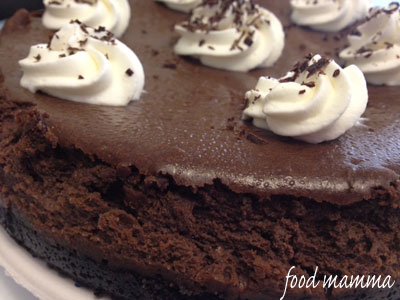
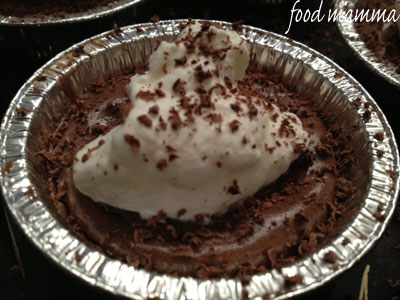
I found this recipe on the Hershey’s website.  I didn’t have enough chocolate cookie crumbs so mixed them with graham crumbs and it worked out just fine. The cheesecake was a hit.  This can be made into one big cheesecake or mini ones made in cupcake tins.

Chocolate Cheesecake
Adapted from Hershey’s

1.5 cups chocolate cookie crumbs
6 TB melted butter

1/4 cup butter or margarine
2 packages softened cream cheese
4 eggs
1/2 cup cocoa
1 can condensed milk
1 TB vanilla

Add the melted butter into the crumbs and blend well.  Press mixture into bottom of 9″ springform pan.

Melt the butter and mix with cocoa until smooth. Set aside.

Beat cream cheese.  Add cocoa mixture and mix well.  Gradually beat in condensed milk until smooth.  Add eggs and vanilla and beat well.  Pour batter into pan prepared with the crumb crust.

Bake at 300 degrees for 1 hour and 5 minutes or until set.  Let cool and garnish with whipped cream and chocolate.

Filed Under: foodmamma Tagged With: cake, dessert

sweet naan bread

October 5, 2012 By Fareen Leave a Comment

I can’t believe it’s already October!  There is a chill in the air but it’s hard to believe that summer is gone, especially when I see these little guys every day.  I’m sure we won’t be seeing them for much longer.

The best way to warm the house, I find, is by baking.  This is one of my breads to make.  It’s super simple and is quite impressive to look at.  My favourite is eating it warm with a pat of butter.  Q likes it best when it’s converted to rusk – sliced and baked again until it’s nice and crisp and then dipped in milk or tea.

This is not your typical naan.  This is more like a bread rather than the usual flatbread. You get the nice flower shape by dividing the dough into seven balls and placing it in a 10″ springform pan, letting the balls grow into each other before baking.

Sweet Naan Bread

Step One:
1/4 cup flour
1 1/2 tsp yeast
pinch salt
pinch sugar
1/2 cup warm water

Mix the above ingredients together and let it sit for ten minutes.

Step Two:
3 oz warm butter
3 1/2 cups flour
2 eggs
pinch of yellow food coloring
1/2 cup sugar
1 tsp fennel seeds
Up to 1 cup warm milk

Mix the first six ingredients in step two together and add the mixture from step one.  Bind the dough together with milk until it comes together.  Divide the dough into seven balls and arrange on a sprinform pan, being sure to leave enough room for it to grow.  Let it rise in a warm place for four hours.  Use an egg wash on top of the risen dough and sprinkle with sesame seeds.  Bake at 350 degrees for 35 to 40 minutes.

Filed Under: foodmamma

chocolate zucchini bread

September 4, 2012 By Fareen 1 Comment

We were lucky to get some home grown zucchini from hubby’s co-worker this year. The possibilities of things to make with them were endless – bread, fritters, pasta…What I really wanted though was chocolate zucchini bread.  I searched for a recipe but most called for canola oil, which we had totally run out of.  I was happy when I found a recipe from Tara from seven spoons.  I loved that the recipe called for so much zucchini – what a great vehicle for eating your veggies!  Q has become a little nut monster lately so he got to pick what we used.  His nut of choice for the bread – pecans.  This bread was so good, it didn’t last long at all.  It was amazing with a tall glass of milk. Q loved it and I was happy for him to have seconds because of all the greens that were baked in. The last batch of the zucchini went into two more loaves today.  So good!  Thanks T for the zucchini and thanks Tara for the great recipe.

Chocolate Zucchini Bread
adapted from seven spoons

3 cups all-purpose flour
1/2 cup cocoa powder
1 tsp baking powder
1 tsp baking soda
1 1/2 tsp salt
1 cup chopped pecans
1 cup chocolate chips
1/2 cup olive oil
1 cup buttermilk
2 eggs
1 1/2 cups sugar
2 tsp vanilla extract
4 cups shredded zucchini

Preheat an oven to 350°F (175°C) and grease two loaf pans.

In a large bowl, whisk together the flour, cocoa powder, baking powder, baking soda and salt. Stir in the nuts and chocolate. Set aside.

In another bowl, whisk together the olive oil and buttermilk. Add the eggs, sugar and vanilla, and beat until smooth. Stir in the zucchini.

Pour the wet ingredients into the dry, stir until combined, taking care not over mix. Divide the batter evenly between the two prepared pans and bake, rotating once, until a cake tester inserted into the loaf comes out almost clean, which should be around 50 minutes. Cool loaves in their pans on a rack for 20 minutes.

Filed Under: foodmamma Tagged With: baked goods, bread, breakfast, vegetables

fudge brownies

August 6, 2012 By Fareen Leave a Comment

One of my new favourite shows is Bake with Anna Olson.  It’s like a teaching cooking show, where Anna shows you a technique or a skill and builds on it, starting with simple to complex.  When I watched the episode with brownies, I knew I had to make them!

I had a house full of people coming in a couple of hours and had errands to run and cleaning to do, but I still had to squeeze in brownie-making time.  It didn’t take long at all to put these together and all in one pot – a bonus!  I didn’t have time to roast the pecans in butter and salt and just tossed them in but the brownies still tasted really good.  I opted to use a mini muffin tin and made them into two bite brownies.

The aroma of the chocolate filled the house and it was intoxicating!  They were easy to make and so delicious, I know I will be making these again and again.

Fudge Brownies
Adapted from Food Network, Bake with Anna Olson

4 ounces unsweetened chocolate, chopped
1 1/4 cups unsalted butter, cut into pieces
1 cup granulated sugar
3/4 cup packed light brown sugar
3 large eggs, room temperature
2 teaspoons vanilla extract
1 cup all-purpose flour
1/4 cup cocoa powder
1 cup pecans

Preheat the oven to 350 degrees F and grease a mini muffin pan for 24 brownies.

Melt the chocolate and butter in a medium pot over medium-low heat, stirring until melted. Remove the pan from the heat and whisk in the sugar and brown sugar right into the pot. Whisk in the eggs one at a time, then whisk in the vanilla. Stir in the flour and cocoa powder until evenly combined.

Roughly chop the pecans and stir most of them into the brownie batter. Divide the batter into the muffin pans and sprinkle the remainder of the pecans on top.

Bake for about 20 minutes, until the tops of the brownies lose their shine. Cool the brownies for an hour before removing from the tin.
 

Filed Under: foodmamma

cheesy ranch fried pickles

June 28, 2012 By Fareen Leave a Comment

Earlier this month, I was contacted to participate in the Hidden Valley Ranch Recipe Challenge.   This involves creating a recipe using the signature ranch dressing or the two new flavours, cheesy and spicy.  This contest is against 15 Canadian food bloggers and besides a prize of a Kitchen Aid mixer or gift certificates to Williams Sonoma, the winning recipe will be demoed live by Chef Ned Bell at the Calgary Stampede.  The Stampede is one of my favourite events so to win would be pretty awesome.

Over the next few days, I will be blogging about a few of my creations.  I would love to know what you think!

The first is fried pickles, completely inspired by my visit to Calgary’s second Smashburger location.  I loved them the first time I went there, and when I took Q to the newest location, he loved them more than I did.

Instead of dipping the pickles in eggs, I used the Cheesy Ranch dressing as the binder for the panko breading.  This added a great flavour and the dressing doubled as a dip for the crispy bites.

Cheesy Ranch Fried Pickles

4 large pickles, sliced
1/2 cup flour
1/2 cup Hidden Valley Ranch, cheddar flavour
1 cup panko

Place the sliced pickles between two pieces of paper towel and pat them dry.  Place the flour, dressing and panko in three separate bowls.  Dredge the pickles in flour, then the dressing and then panko.  Fry until golden brown. 

Filed Under: foodmamma

egg boats

May 26, 2012 By Fareen Leave a Comment

Hard to believe my sister is getting married in two weeks! With her and her fiance living in two different countries, it’ll be nice for them to finally be together.

Before my sister and her fiance headed out of town for one last adventure before their wedding, we had a little family breakfast as a send off.  We had lots of sweets – pain au chocolat, tres leches cake, chocolate chip cookies.  We also had fresh fruit, turkey bacon, chicken sausages, hashbrowns, samosas…and egg boats!

I was going to do my usual frittata.  Always a hit and super easy, it’s one of my go-to breakfasts.  I came across this egg boat though on Pinterest and knew I had to change it up.

This recipe comes from the site Spoon Fork Bacon.  I loved the idea of the eggs baked into the bread with all those veggies.  The result was a very tasty breakfast and something a little different.

Instead of using mini baguettes, we used two long ones to feed the crowd.  I kind of wish I did one more to enjoy for breakfast the next day. This recipe is definitely a keeper!

Egg Boats
Adapted from Spoon Fork Bacon

1 long baguette
6 eggs
1/3 cup heavy cream
1/2 cup grated cheddar
2 green onions, sliced
1 red pepper, diced
1/2 onion, diced
salt
pepper

Preheat oven to 350 degrees F.

Cut a deep “V” through the top of the baguette until about a 1/2 inch to the bottom. Partially unstuff the baguettes.

Place the eggs and cream into a mixing bowl and lightly beat together. Whisk in the remaining ingredients and lightly season with salt and pepper.

Pour the mixture into the baguette boat and place onto a baking sheet.

Bake for 35 to 40 minutes or until golden brown, puffed and set in the center.

Allow to cool for about 5 minutes, cut and serve.

Filed Under: foodmamma Tagged With: breakfast, celebrations

cinnamon buns – happy mother’s day!

May 14, 2012 By Fareen 1 Comment

After discovering last month Q’s love of cinnamon rolls at the mall, I knew it was something I wanted to try at home.  Q loves being in the kitchen and helping mamma so it was the perfect project for Mother’s Day.  I searched for a recipe similar to Cinnabon and discovered this recipe from Joshua Kennon.

There was some resting time required but it was a really simple recipe.  Q helped out with measuring ingredients, rolling out the dough and slathering on the butter.

This recipe made quite a few rolls – 12 large ones and then 12 mini ones from the scrap.  It was so fun watching the rolls rise into each other. 

The best part was the intoxicating smell as these rolls baked.  The smells competed with the gorgeous lilies I received for Mother’s Day.  Mmmmm….

While the buns were baking, I whipped up some of the cream cheese frosting I’ve used on muffins and it went great with the buns!  You just can’t beat fresh out of the oven cinnamon buns.

It was an awesome day!  Happy Mother’s Day to all the wonderful moms out there.  Hope your day was as great as mine!

Cinnamon Buns
Adapted from Joshua Kennon

1 cup warm milk
2 eggs, room temperature
1/3 cup butter, melted
4 1/2 cups all purpose flour
1 teaspoon salt
1/2 cup white sugar
2 1/4 tsp instant yeast

3/4 cup brown sugar, packed
2 1/2 tablespoons ground cinnamon
1/2 cup butter, softened

Microwave the milk for 45 to 60 seconds. Then, dissolve yeast in warm milk in a large bowl. Add sugar, butter, salt, eggs, and flour. Mix well. Allow the dough to come together with the dough hook of the mixer.

Put the ball of dough into a bowl that is sprayed with cooking spray.  Cover the bowl tightly with plastic wrap and let rise in a warm place for roughly 1 hour or until dough has doubled in size. 

Once the dough has risen, roll it out into a 16 x 21″ rectangle.  Spread the softened butter on the dough and then sprinkle with brown sugar and cinnamon.

Roll up the dough starting with the longer side and cut into 12 cinnamon rolls (or more smaller rolls, if you prefer). To even out the rectangle, I cut off all the edges and the scraps made an additional 12 mini rolls.

Place the cinnamon rolls in a lightly greased rectangular pan. Let the rolls rise another 30 to 60 minutes.

Preheat oven to 350 degree.  Once your cinnamon rolls have risen, bake them in the preheated oven until golden brown, approximately 18 to 20 minutes.

Eat warm as is or with some delicious cream cheese frosting.

Filed Under: foodmamma

coconut jam tarts

March 7, 2012 By Fareen Leave a Comment

I was looking for a quick sweet treat to make the other day for a gathering when I remembered my mom’s coconut jam tarts.  She’s been making these for years and, if you love coconut, these are the perfect indulgence.  It’s a great way to use up some of the jam you may have made over the summer and by using premade tart shells, this dessert takes only minutes to prepare.  The combination of the sweet jam with the flaky pastry and the buttery coconut topping is delicious! 

Coconut Jam Tarts

1/2 cup butter
1 cup sugar
3 eggs
3 cups shredded coconut
35 mini tart shells
jam

Cream together the butter and sugar.  Add the eggs.  Mix in the coconut.
Place 1/2 tsp of jam at the bottom of each tart shell.  Cover the jam with a spoonful of the coconut mixture.
Bake at 350 degrees for 25 – 30 minutes.

Filed Under: foodmamma Tagged With: dessert

tres leches cake

February 23, 2012 By Fareen Leave a Comment

I am still thinking about our trip last month to Mexico.  Apparently Q is too, since every couple days, he asks to go back.  One of our earlier nights there, I tried the most amazing cakes – tres leches cake. It was so moist and delicious.  My friend S encouraged me to get the recipe.  On our last nights, Chef Fernando and Chef Ivan, with the aid of a translator, shared the recipe.

This is a picture of us with the chefs.  They were super helpful and happily obliged with this foodie’s request.

I wish that I had come home and made this cake right away.  Instead I waited, and in the waiting, some of the translation was lost.  The measurements were also for 100 pieces so I didn’t think it was a good idea to even attempt it.

It was definitely a cake that I wanted to make though, for my mother-in-laws birthday.  There were so many variations on google but I finally settled on one that I had seen on the Food Network show, Mexican Made Easy by Marcela Valladolid.

After I pulled it out of the oven, it fell in the middle but I covered it up with whipping cream.  No one was the wiser.  This cake was quite different from the firm cake we had in Mexico but the taste was delicious.  The sweetness of the milk that was absorbed into the cake and then oozed out when it was cut into was amazing.  This cake was light and rich all at the same time.  The best part – my father-in-law requested the same for his birthday next month!

Tres Leches Cake
Adapted From Marcela Valedolid, Mexican Made Easy

Nonstick cooking spray, for the cake pan
1 1/2 cups all-purpose flour, plus more for dusting the cake pan
1 tablespoon baking powder
4 large eggs, separated
1 1/2 cups sugar
1/2 cup whole milk
1 (14-ounce) can sweetened condensed milk
1 (12-ounce) can evaporated milk
2 cups heavy cream, divided
1 tablespoon powdered sugar
1/2 teaspoon ground cinnamon
1/2 teaspoon cocoa

Preheat the oven to 350 degrees F. Spray and flour a 10-inch cake pan with 2-inch high sides and then line with parchment paper. Grease the parchment paper.

Mix the flour and baking powder in a medium bowl. Set aside.

In a large mixing bowl, using an electric mixer with the whisk attachment, whip the egg whites until frothy. With the mixer running, gradually add the sugar and beat to stiff peaks. Beat in the yolks, 1 at a time, blending well after each addition. Add the flour mixture in 3 additions, alternating with the whole milk in 2 additions.

Pour the batter into the prepared pan and bake until a tester inserted into the center comes out clean, about 30 minutes. Cool the cake slightly, about 10 minutes, then invert onto a platter with 1-inch high sides.

Pierce the top of the cake all over with a thick skewer. Mix the sweetened condensed milk, evaporated milk, and 1 cup heavy cream in a medium bowl. Pour the mixture over the cake while warm. Cover and refrigerate until cold, about 3 hours or overnight.

Combine the remaining 1 cup heavy cream and powdered sugar in a medium bowl. Using an electric mixer, beat the cream until soft peaks form. Spread the whipped cream onto top of the cake and sprinkle with the ground cinnamon and cocoa.

Filed Under: foodmamma Tagged With: cake

moon palace shortbread

February 2, 2012 By Fareen Leave a Comment

It is quite obvious to anyone that knows me how much of a sweet tooth I have.  To find that the resort had little shortbread cookies everywhere for us to enjoy was quite the treat!  Some of these were chocolate, some had nuts, others had coconut.  They were so yummy.

One of the chefs, Manuel, was kind enough to share how to make these delectable cookies.  He was very sweet and worked with the hostess to translate the recipe for me.  I haven’t made these yet myself at home.  I’m afraid they won’t last long if I do!

Moon Palace Shortbread

2.5 cups sugar
1 pound butter
5 eggs
5 cups flour
1 TB baking powder
splash of vanilla

Cream together the sugar and butter and until fluffy.  Add in the eggs, one at a time followed by the vanilla.  Add the flour and baking powder and mix until the dough comes together.  Bake at 350 degrees until the cookie sets but doesn’t brown.  Makes lots!

Filed Under: foodmamma Tagged With: cookies

  • « Go to Previous Page
  • Page 1
  • Interim pages omitted …
  • Page 8
  • Page 9
  • Page 10
  • Page 11
  • Page 12
  • Go to Next Page »

Primary Sidebar

Let’s Connect!

  • Email
  • Facebook
  • Instagram
  • Pinterest
  • Twitter

Hello!

My name is Fareen and I'm so happy you stopped by! This blog is about my favourite things - family, food and travel. Here you will find adventures with hubby, my two boys and my great big family. There is food (lots of food!), as much travel as we can squeeze in and just life in general.

Sign up for our mailing list!

* indicates required

Featured Post

School Lunch Ideas

Copyright © 2009–2025 · Food Mamma / Fareen Jadavji-Jessa· All Rights Reserved / Privacy Policy