• Skip to primary navigation
  • Skip to main content
  • Skip to primary sidebar

Food Mamma

Food | Travel | Family | Life

  • home
  • about me
  • recipe index
  • eating out
  • events
  • travel

cake

tres leches cake

February 23, 2012 By Fareen Leave a Comment

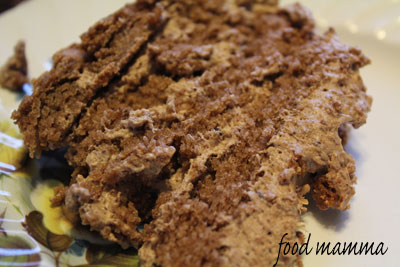
I am still thinking about our trip last month to Mexico.  Apparently Q is too, since every couple days, he asks to go back.  One of our earlier nights there, I tried the most amazing cakes – tres leches cake. It was so moist and delicious.  My friend S encouraged me to get the recipe.  On our last nights, Chef Fernando and Chef Ivan, with the aid of a translator, shared the recipe.

This is a picture of us with the chefs.  They were super helpful and happily obliged with this foodie’s request.

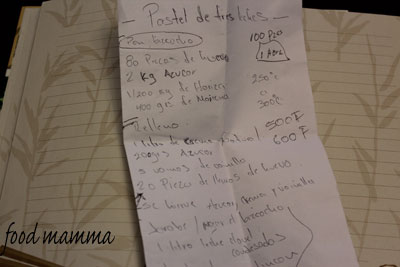
I wish that I had come home and made this cake right away.  Instead I waited, and in the waiting, some of the translation was lost.  The measurements were also for 100 pieces so I didn’t think it was a good idea to even attempt it.

It was definitely a cake that I wanted to make though, for my mother-in-laws birthday.  There were so many variations on google but I finally settled on one that I had seen on the Food Network show, Mexican Made Easy by Marcela Valladolid.

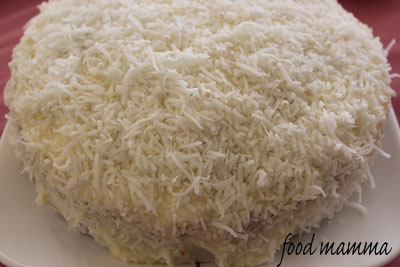
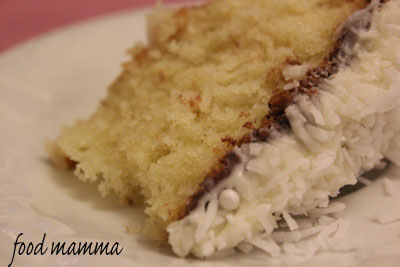
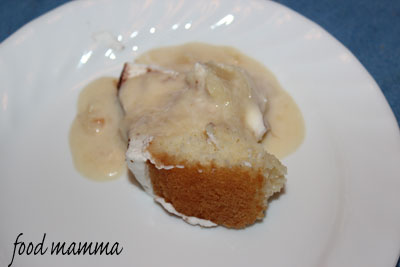
After I pulled it out of the oven, it fell in the middle but I covered it up with whipping cream.  No one was the wiser.  This cake was quite different from the firm cake we had in Mexico but the taste was delicious.  The sweetness of the milk that was absorbed into the cake and then oozed out when it was cut into was amazing.  This cake was light and rich all at the same time.  The best part – my father-in-law requested the same for his birthday next month!

Tres Leches Cake
Adapted From Marcela Valedolid, Mexican Made Easy

Nonstick cooking spray, for the cake pan
1 1/2 cups all-purpose flour, plus more for dusting the cake pan
1 tablespoon baking powder
4 large eggs, separated
1 1/2 cups sugar
1/2 cup whole milk
1 (14-ounce) can sweetened condensed milk
1 (12-ounce) can evaporated milk
2 cups heavy cream, divided
1 tablespoon powdered sugar
1/2 teaspoon ground cinnamon
1/2 teaspoon cocoa

Preheat the oven to 350 degrees F. Spray and flour a 10-inch cake pan with 2-inch high sides and then line with parchment paper. Grease the parchment paper.

Mix the flour and baking powder in a medium bowl. Set aside.

In a large mixing bowl, using an electric mixer with the whisk attachment, whip the egg whites until frothy. With the mixer running, gradually add the sugar and beat to stiff peaks. Beat in the yolks, 1 at a time, blending well after each addition. Add the flour mixture in 3 additions, alternating with the whole milk in 2 additions.

Pour the batter into the prepared pan and bake until a tester inserted into the center comes out clean, about 30 minutes. Cool the cake slightly, about 10 minutes, then invert onto a platter with 1-inch high sides.

Pierce the top of the cake all over with a thick skewer. Mix the sweetened condensed milk, evaporated milk, and 1 cup heavy cream in a medium bowl. Pour the mixture over the cake while warm. Cover and refrigerate until cold, about 3 hours or overnight.

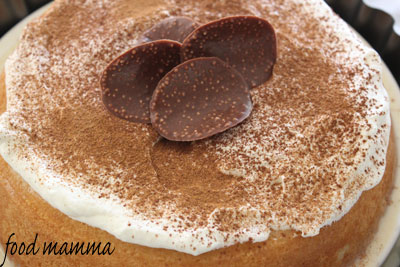
Combine the remaining 1 cup heavy cream and powdered sugar in a medium bowl. Using an electric mixer, beat the cream until soft peaks form. Spread the whipped cream onto top of the cake and sprinkle with the ground cinnamon and cocoa.

Filed Under: foodmamma Tagged With: cake

coconut cake

August 31, 2011 By Fareen Leave a Comment

We celebrated another anniversary this month – my in-laws.   We had a Mexican feast to celebrate their 36 years of marriage.

I had a cake in mind that I wanted to try and this seemed like the perfect opportunity to make it.  I had seen Ina’s famous coconut cake many times on her show Barefoot Contessa.  It was also recently showcased on Next Food Network Star so I knew I just had to try it out.

 I gathered the ingredients together and when I went to preheat the oven, I found that my oven had completely stopped working!  I was not going to let that stop me from making this cake, so I loaded up my car and finished the cake off at my parents.

I made a few changes to up the coconut factor and of course I had to add some chocolate.  I made one layer rather than two and found that it was the perfect amount.  This cake was a hit!  I even saw my father-in-law have seconds – unusual for someone who doesn’t eat sugar.  I will definitely be making this cake again and again (once I get my oven fixed).

Coconut Cake

1 1/2 sticks butter, softened
1 cup sugar
3 eggs
3/4 tsp vanilla extract
3/4 tsp coconut extract
1 1/2 cups flour
1/2 tsp baking powder
1/4 tsp baking soda
1/4 tsp salt
1/2 cup coconut milk
2 ounces sweetened shredded coconut

nutella
cream cheese frosting (below)

Preheat the oven to 350 degrees and grease one 9-inch round cake pan.

Cream the butter and sugar on medium-high speed for 3 to 5 minutes, until light yellow and fluffy. Add eggs 1 at a time.  Add the extracts and mix well.

In a separate bowl, sift together the flour, baking powder, baking soda and salt. Alternately add the dry ingredients and the milk to the batter in 3 parts, beginning and ending with dry ingredients. Mix until just combined and then fold in the coconut. 

Bake in the center of the oven for 45 to 55 minutes. Cool on a baking rack for 30 minutes before frosting.

Cover the top of the cake with nutella.  Wait 5 minutes before icing the entire cake with the cream cheese frosting and covering it with coconut.

Cream Cheese Frosting

1 package cream cheese
1 stick butter, softened
1/2 tsp vanilla extract
1/4 tsp coconut extract
1/2 pound icing sugar
3 ounces sweetened shredded coconut

Combine the cream cheese, butter, and extracts on low speed. Add the icing sugar and mix. 

Filed Under: foodmamma Tagged With: baked goods, cake, celebrations

celebrating 37 years with a turtle cheesecake

August 6, 2011 By Fareen 2 Comments

My parents just celebrated their 37th anniversary!  This definitely called for a celebration, and every celebration calls for cake.  Tired of making the usual though, I wanted to do something different.  I decided to do a cheesecake, a dessert that my dad loves.

I knew this cheesecake needed nuts, chocolate and caramel and after doing a search, this recipe was found on the Kraft website.  The layers of caramel and pecans are divine.  As good as it tastes when you first make it, it tastes even better the next day, if there’s any left!

Happy Anniversary Mom and Dad!  Love you lots!


Ultimate Turtle Cheesecake

2 cups chocolate cookie crumbs
6 Tbsp.  butter or margarine, melted
1 pkg. caramels
1/2 cup  milk
1 cup chopped pecans
3 pkg. cream Cheese, softened
3/4 cup sugar
1 Tbsp. vanilla
3 eggs
2 squares chocolate, melted

Heat oven to 325°F.

Mix crumbs and butter; press onto bottom and 2 inches up side of 9-inch springform pan.

Microwave caramels and milk in small microwaveable bowl on high 3 min. or until caramels are completely melted, stirring after each minute. Stir in nuts; pour half into crust. Refrigerate 10 min. Refrigerate remaining caramel mixture for later use.

Beat cream cheese, sugar and vanilla with mixer until well blended. Add eggs, 1 at a time, mixing on low speed after each just until blended. Pour over caramel layer in crust.

Bake 1 hour 5 min. to 1 hour 10 min. or until center is almost set. Run knife around rim of pan to loosen cake; cool before removing rim. Refrigerate 4 hours.

Microwave reserved caramel mixture 1 min.; stir. Pour over cheesecake. Melt chocolate and drizzle over cheesecake.

Filed Under: foodmamma Tagged With: cake, celebrations, dessert

mini red velvet cupcakes for my sister’s birthday

June 21, 2011 By Fareen 1 Comment

My sister’s coming for a visit!  S currently lives in Tajikistan, a mountainous country in Central Asia.  It’s a long way to travel and her visits are always way too short!

With yesterday being my sister’s birthday, we definitely need cake to welcome her home.  I had some cream cheese icing in the freezer, just needed a cake that we could slather it on.  Besides carrot cake, the only other thing that came to mind was red devil.  I had never made it before and on my hunt for a recipe, many had full bottles or more of food colouring!  The recipe that I finally settled on only had 1 tablespoon.  This recipe for mini red devil cupcakes comes from Simple Recipes.  I didn’t have buttermilk so swapped it out with some homemade yogurt (which my mom makes for us weekly – I know, I am so spoiled!).

This was a simple recipe and these cupcakes were delicious!  Hope S loves them too!


Mini Red Velvet Cupcakes

1 1/4 cups all purpose flour
1 tablespoon cocoa powder
2/3 cup sugar
1 large egg
1/2 cup homemade yogurt
1/4 cup unsalted butter
1 tablespoons red food coloring
1/2 teaspoon vanilla extract
1/2 teaspoon white vinegar
1/2 teaspoon baking powder
1/2 teaspoon baking soda
1/2 teaspoon salt

Preheat the oven at 350 degrees.

In a large bowl, sift together the flour, cocoa powder, baking soda, baking powder, and salt. In another bowl whisk together the buttermilk, vinegar, vanilla extract, and red food coloring. Beat the butter and sugar in an electric mixer until light and fluffy. Add the egg beating until a creamy texture. Add 1/4 of the flour and mix, then add 1/3 of the buttermilk mix .

Continue adding the flour and the buttermilk until all the ingredients are mixed.

Use two teaspoons and carefully scoop the batter into cupcake papers, about 1/2 to 3/4 of the way full. Bake for 12 minutes or until a toothpick comes out clean.

Transfer the baked cupcakes to a wire rack to cool.

For the frosting, I used this cream cheese icing.

Filed Under: foodmamma Tagged With: cake, cupcakes

chocolate cupcakes for graduation

June 6, 2011 By Fareen Leave a Comment

It’s convocation day!!  Hubby is getting his Masters today! S has worked hard for this degree.  It took a few years, with him squeezing it in while working many hours at a demanding job.  He also had a baby at home wanting to play and a wife wanting some attention too.  It was hard work, with sleepless nights, so this calls for some celebration.  As with any milestone, cake is definitely in order!   

I think this might be my new favorite cupcake recipe.  It’s Martha Stewart’s One-Bowl Chocolate Cupcakes.  No need to separate the dry ingredients from the wet and they were ready in 20 minutes!  I didn’t have buttermilk so I substituted that with yogurt mixed with some water and I used canola oil rather than safflower.

One-Bowl Chocolate Cupcakes

3/4 cup unsweetened cocoa powder
1 1/2 cups all-purpose flour
1 1/2 cups sugar
1 1/2 teaspoons baking soda
3/4 teaspoon baking powder
3/4 teaspoon salt
2 large eggs
3/4 cup warm water
3/4 cup buttermilk
3 tablespoons safflower oil
1 teaspoon pure vanilla extract

Preheat oven to 350 degrees. Line standard muffin tins with paper liners; set aside. Sift together cocoa powder, flour, sugar, baking soda, baking powder, and salt into a large bowl. Add eggs, warm water, buttermilk, oil, and vanilla, and mix until smooth, about 3 minutes. Scrape down the sides and bottom of bowl to assure batter is well mixed.
  
Divide batter evenly among muffin cups, filling each 2/3 full. Bake until tops spring back when touched, about 20 minutes, rotating pan once if needed. Transfer to a wire rack; let cool completely.

Filed Under: foodmamma Tagged With: cake, celebrations

food mamma is one! chocolate layered birthday cake

March 29, 2011 By Fareen 1 Comment

Food Mamma is ONE!  Wow, a whole year has gone by since my first post.  As much as I loved the idea of a food blog, I wondered if I would be able to maintain it, and come up with different things to make and post about.  Turns out, content wasn’t an issue. Finding time to post the content, well that’s another story.

I am inspired daily by all the wonderful blogs that I read.  They influence this blog and make me want to inspire others.  Thanks to everyone for stopping by and for your comments. 

I thought it would be fitting today to post the amazing cake my mom made for my birthday this year.  Q requested chocolate so mom happily obliged.  Four layers of chocolately goodness separated by a mocha whipped cream icing.  The rich cake with the light icing made it a perfect pairing. Delicious!

Four Layered Chocolate Cake
4 oz. unsweetened chocolate squares
1/2 cup hot water
1/2 cup sugar
2 cups flour
1 tsp baking powder
1 tsp salt
1/2 cup butter
1/2 cup margarine
1 1/4 cup sugar
1 tsp vanilla
3 eggs
2/3 cup milk

Mix the first three ingredients and keep aside.

Mix the dry ingredients and keep aside.

Beat the butter, margarine, sugar, vanilla, eggs and milk.  Add the dry ingredients and mix well.  Add the chocolate mixture to this and mix again.  Pour batter into 2 round cake pans and bake at 350 degrees for 40 to 45 minutes.  Once the cakes have cooled, cut each layer in half so that you have four layers.  Frost all layers with the icing.

Icing
3 cups whipping cream
1 1/2 cup sugar
1/2 cup unsweetened cocoa
pinch salt
2 tsp instant coffee Beat all the ingredients together until the whipping cream comes together.

Filed Under: foodmamma Tagged With: cake, chocolate, milestones

carrot cupcakes with cream cheese icing: happy birthday dad!

March 22, 2011 By Fareen 1 Comment

Today is my dad’s birthday.  There are many words to describe this amazing man – wonderful, giving, selfless, loving.

When Q turned one and I went back to work, I was lucky to have my dad take care of my son.  While many had to worry about who was taking care of their children, I had reassurance that Q was in good hands.  Not many grandfathers would take on the task of looking after a toddler, let alone changing diapers!  Even now that I am home trying to start up a business, my dad takes care of Q for a few hours a day.  I am so grateful to my dad, I don’t know what I would do without him. His day definitely needs to be celebrated.

Since we had lots of chocolate cake on the weekend, I called my aunt for her amazing carrot cake recipe.  This was a really easy cake to make, with everything blended in a food processor.  Nuts are optional but I chose to add walnuts which added the perfect crunch to the moist cakes.

Carrot Cake

2 cups carrots, grated
1 cup oil
3 eggs
1 cup sugar
1.5 cups flour
1.5 tsp baking powder
1.5 tsp baking soda
1 tsp cinnamon
1/4 cup chopped nuts

Grate the carrots in a food processor.  Add oil and eggs and blitz until combined.  Add sugar and blitz again.  Add the dry ingredients and blitz until combined.  Gently stir in the nuts.  Bake at 350 degrees for 35 to 40 minutes.

Cream Cheese Frosting

1 block cream cheese
1 stick butter
3/4 cup icing sugar

Beat until combined.

Filed Under: foodmamma Tagged With: cake, celebrations

chocolate cake with nutella whip icing: happy birthday mom!

November 26, 2010 By Fareen Leave a Comment

Today is my mom’s birthday! My mother is known for her wonderful cakes and she is kind enough to make them for all of our birthdays. I felt that she definitely deserved to have someone make a cake for her, so Q and I took on the task.  I couldn’t decide what to make but Q said chocolate so chocolate it was!  The recipe I used was Kraft’s Best Ever Chocolate Cake. I wanted a lighter icing though and thought what could be better than chocolately nutella and airy whipping cream.  We tried it out and the combination was delicious!  Along with the cream, I added a layer of nutella between the two layers as well.  Sprinkled with some grated chocolate chocolate, it was the perfect way to celebrate a classy lady.  Happy Birthday Mom!  Love you!

Kraft’s Best Ever Chocolate Cake
From Kraft Foods

2/3 cup butter, softened
1-3/4 cups each flour and granulated sugar
1-1/4 tsp. baking soda
1/2 tsp. Magic Baking Powder
1-1/4 cups water
4 squares Baker’s Unsweetened Chocolate, melted, cooled
1 tsp. vanilla
3 eggs

Heat oven to 350ºF.

Grease and flour 2 (9-inch) round pans. Beat all cake ingredients except eggs in large bowl with mixer 2 min. or until well blended. Add eggs; beat 2 min. Pour into prepared pans.

Bake 35 to 40 min. or until toothpick inserted in centres comes out clean. Cool 10 min.; remove to wire racks. Cool completely.

Nutella Whip Icing

2 cups whipping cream
1/4 cup nutella

Whip the cream until doubled in volume but right before soft peaks are formed.  Heat the nutella and gently fold into the cream and beat until completely whipped.  Refrigerate until ready for the cake.

Filed Under: foodmamma Tagged With: cake, dessert, events

  • « Go to Previous Page
  • Page 1
  • Page 2
  • Page 3

Primary Sidebar

Let’s Connect!

  • Email
  • Facebook
  • Instagram
  • Pinterest
  • Twitter

Hello!

My name is Fareen and I'm so happy you stopped by! This blog is about my favourite things - family, food and travel. Here you will find adventures with hubby, my two boys and my great big family. There is food (lots of food!), as much travel as we can squeeze in and just life in general.

Sign up for our mailing list!

* indicates required

Featured Post

Afternoon Tea

Afternoon Tea

Copyright © 2009–2020 · Food Mamma / Fareen Jadavji-Jessa· All Rights Reserved / Privacy Policy